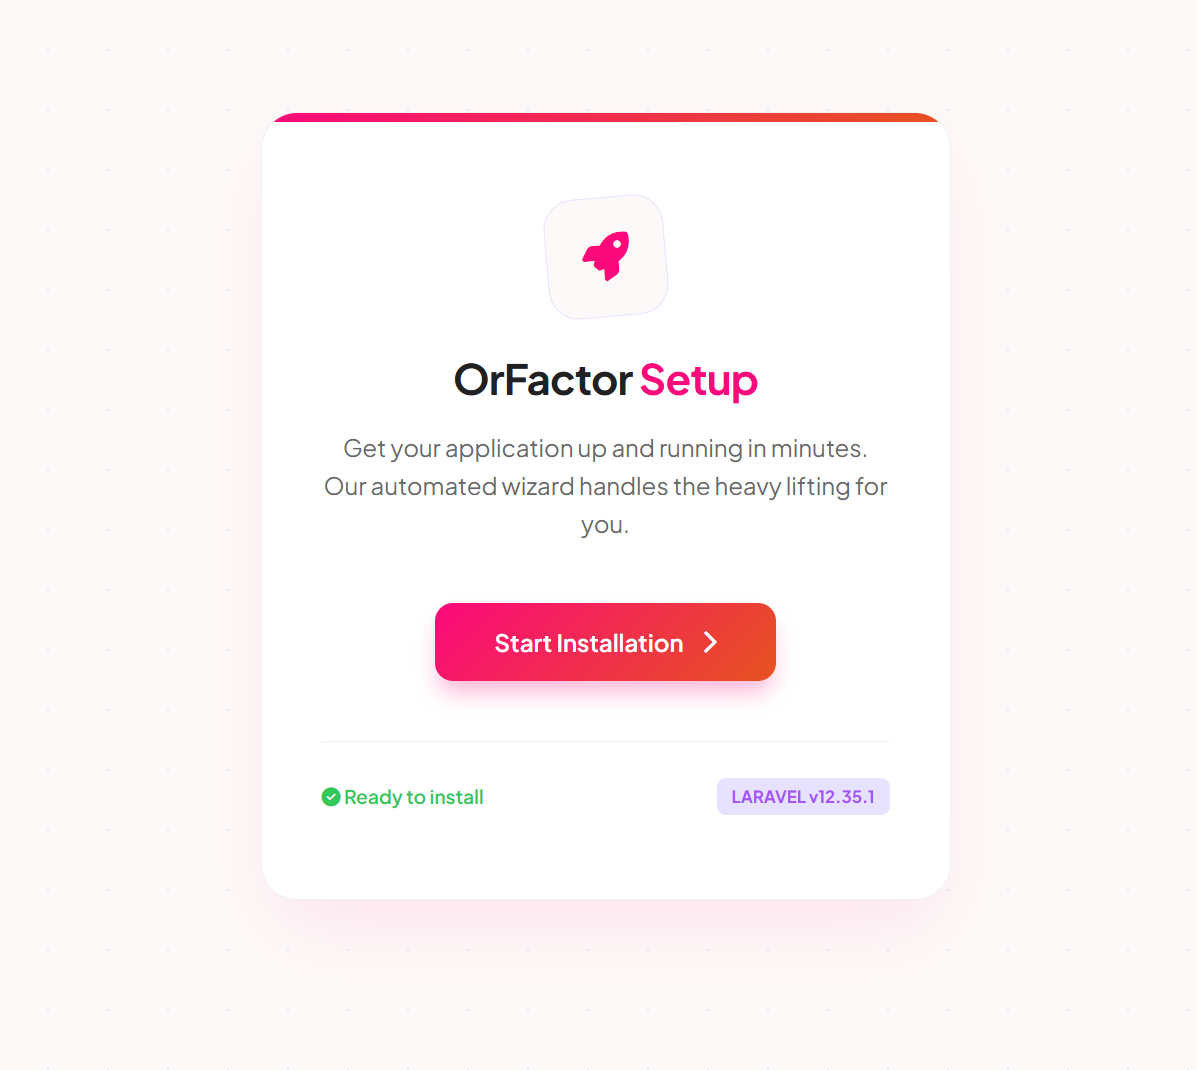
Installation Guide
Follow these steps to set up Eventiq on your server. Ensure your environment meets the Laravel 12 requirements before starting.
vendor
folder. This is intentional. After extracting the project, run
composer install --no-dev --optimize-autoloader from the project root before opening
the installer.
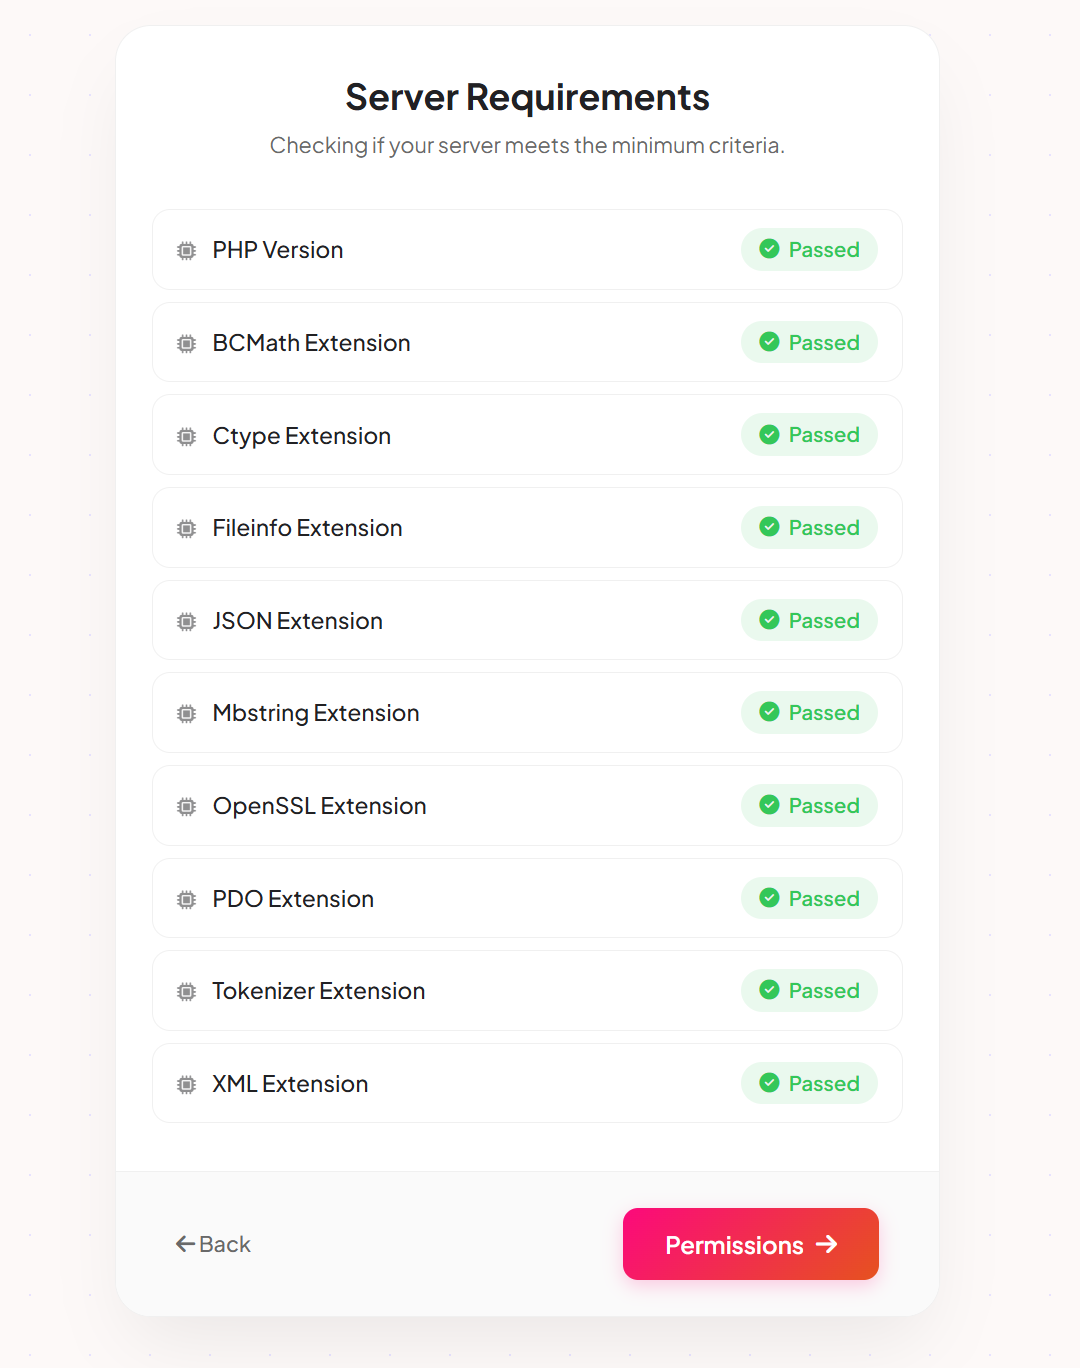
🖥️ Server Requirements
Your server must meet the following PHP and extension requirements:
- PHP >= 8.2
- BCMath PHP Extension
- Ctype PHP Extension
- Fileinfo PHP Extension
- JSON PHP Extension
- Mbstring PHP Extension
- OpenSSL PHP Extension
- PDO PHP Extension
Recommended:
- MySQL 5.7+ / MySQL 8.0+ / MariaDB 10+
- Apache or Nginx (URL rewrite enabled)
- SSL (HTTPS) recommended for payments and QR check-in
- Outbound HTTPS access allowed (for license verification and integrations)
allow_url_fopen is enabled for the license
verification system.
Quick Start for All Platforms
Use the steps below based on where you want to run the project.
Run on Local Computer
Use this for Windows, Linux, or macOS local development.
- Extract the project files on your computer.
- Open terminal in the project root.
- Run
composer install --no-dev --optimize-autoloader. - Copy
.env.exampleto.env. - Run
php artisan key:generate. - Create a MySQL database and update database credentials in
.env. - Run
php artisan optimize:clear. - Start the project with
php artisan serveor create a local virtual host that points to thepublicfolder. - Open the local URL in your browser and finish the installer.
Run on Live Server
Use this for VPS, dedicated server, cPanel, or shared hosting.
- Upload and extract the project files on the server.
- Point your domain or subdomain document root to the
publicfolder. - Run
composer install --no-dev --optimize-autoloaderin the project root. - Copy
.env.exampleto.env. - Run
php artisan key:generate. - Create a MySQL database and update database credentials in
.env. - Make
storageandbootstrap/cachewritable. - Run
php artisan optimize:clear. - Open
your-domain.com/installer/installin the browser and finish the setup wizard.
Install Dependencies
Run Composer from the project root after upload or extraction:
composer install --no-dev --optimize-autoloaderIf your hosting provider does not offer SSH or terminal access, ask them to run Composer for you before starting the installer.
How to Install Composer
Composer is required because the final package does not include the vendor folder.
Windows
- Install PHP 8.2 or later if it is not already available in your local or server stack.
- Download
Composer-Setup.exefromhttps://getcomposer.org/download/. - Select your PHP executable when the installer asks for it.
- Allow the installer to add Composer to your system
PATH. - Finish the installation and reopen PowerShell or Command Prompt.
- Verify Composer by running
composer --version.
Linux
- Install PHP,
curl,zip, andunzip. - Download the installer:
php -r "copy('https://getcomposer.org/installer', 'composer-setup.php');"- Run the installer:
php composer-setup.php- Move Composer to a global path:
sudo mv composer.phar /usr/local/bin/composer- Remove the installer file:
php -r "unlink('composer-setup.php');"- Verify Composer by running
composer --version.
macOS
- Install PHP if it is not already installed.
- Download the installer:
php -r "copy('https://getcomposer.org/installer', 'composer-setup.php');"- Run the installer:
php composer-setup.php- Create the global binary directory if needed:
mkdir -p /usr/local/bin- Move Composer to a global path:
mv composer.phar /usr/local/bin/composer- Remove the installer file:
php -r "unlink('composer-setup.php');"- Verify Composer by running
composer --version.
Shared Hosting
- If SSH access is available, install Composer in your account or use the server's global Composer command.
- If SSH access is not available, ask the hosting provider to run Composer for you.
- Many hosting providers already have Composer installed globally.
If composer Command Is Not Found
- Try
php composer.phar --versionif Composer was installed locally. - On Linux or macOS, confirm
/usr/local/binis available in yourPATH. - On Windows, reopen the terminal after installation so the updated
PATHis loaded.
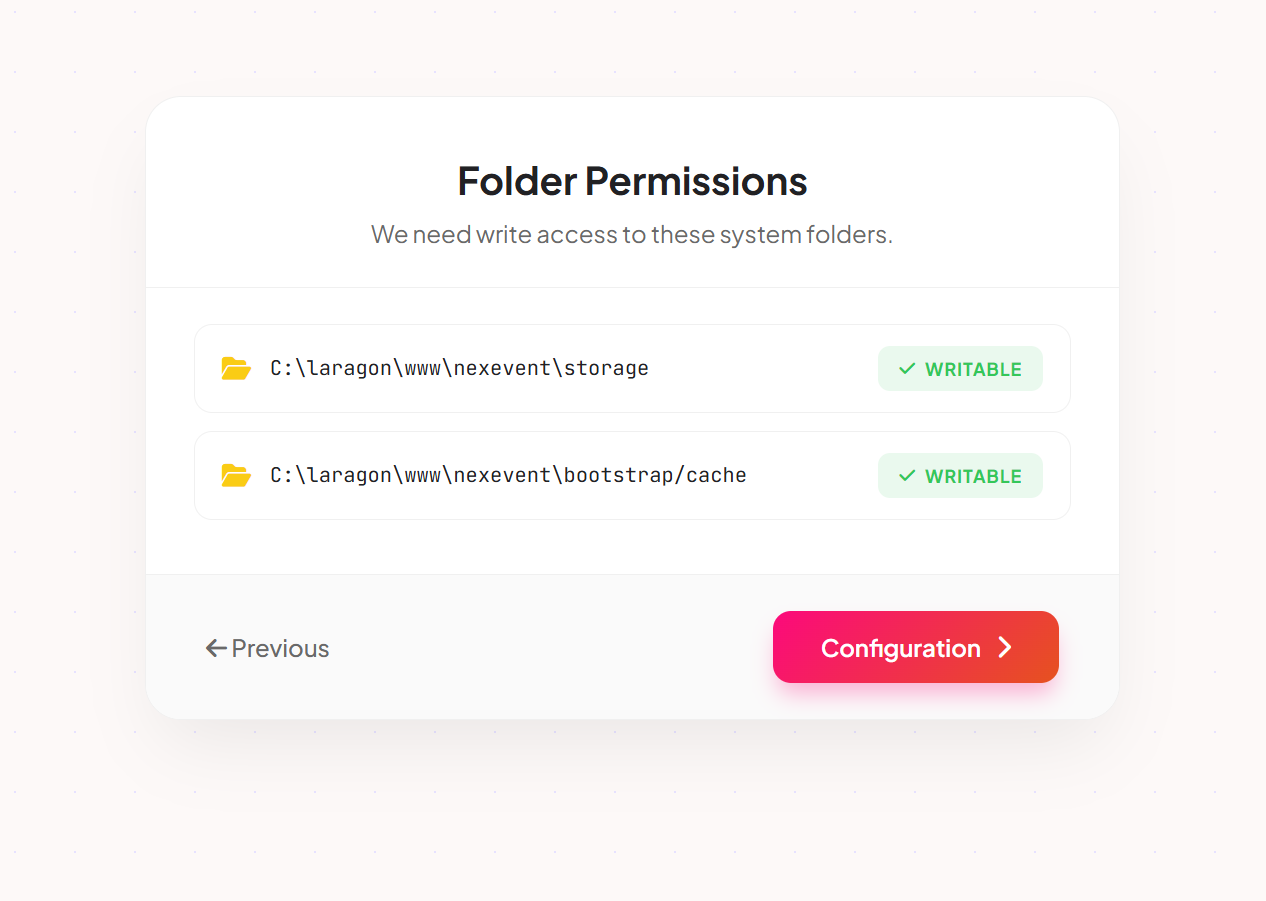
Folder Permissions (Linux / VPS)
Before running the installer, ensure these folders are writable:
storage/bootstrap/cache/
Example commands:
chmod -R 775 storage
chmod -R 775 bootstrap/cache
Shared hosting: If you cannot use SSH, set folder permission to 755/775 from your file manager. If permission issues persist, contact your hosting provider.
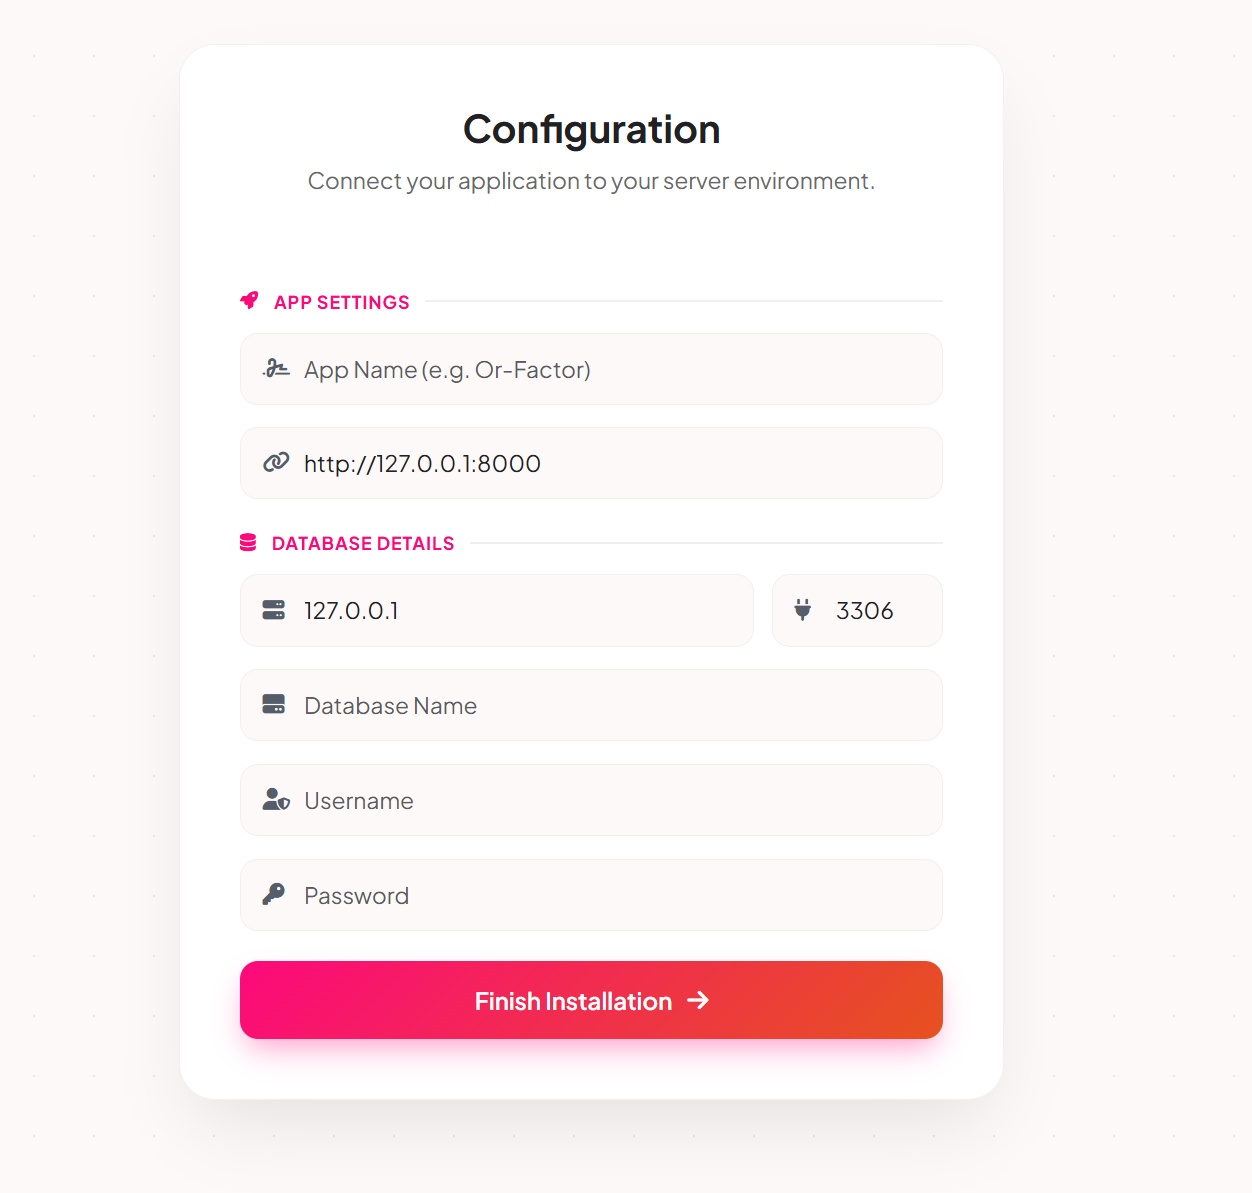
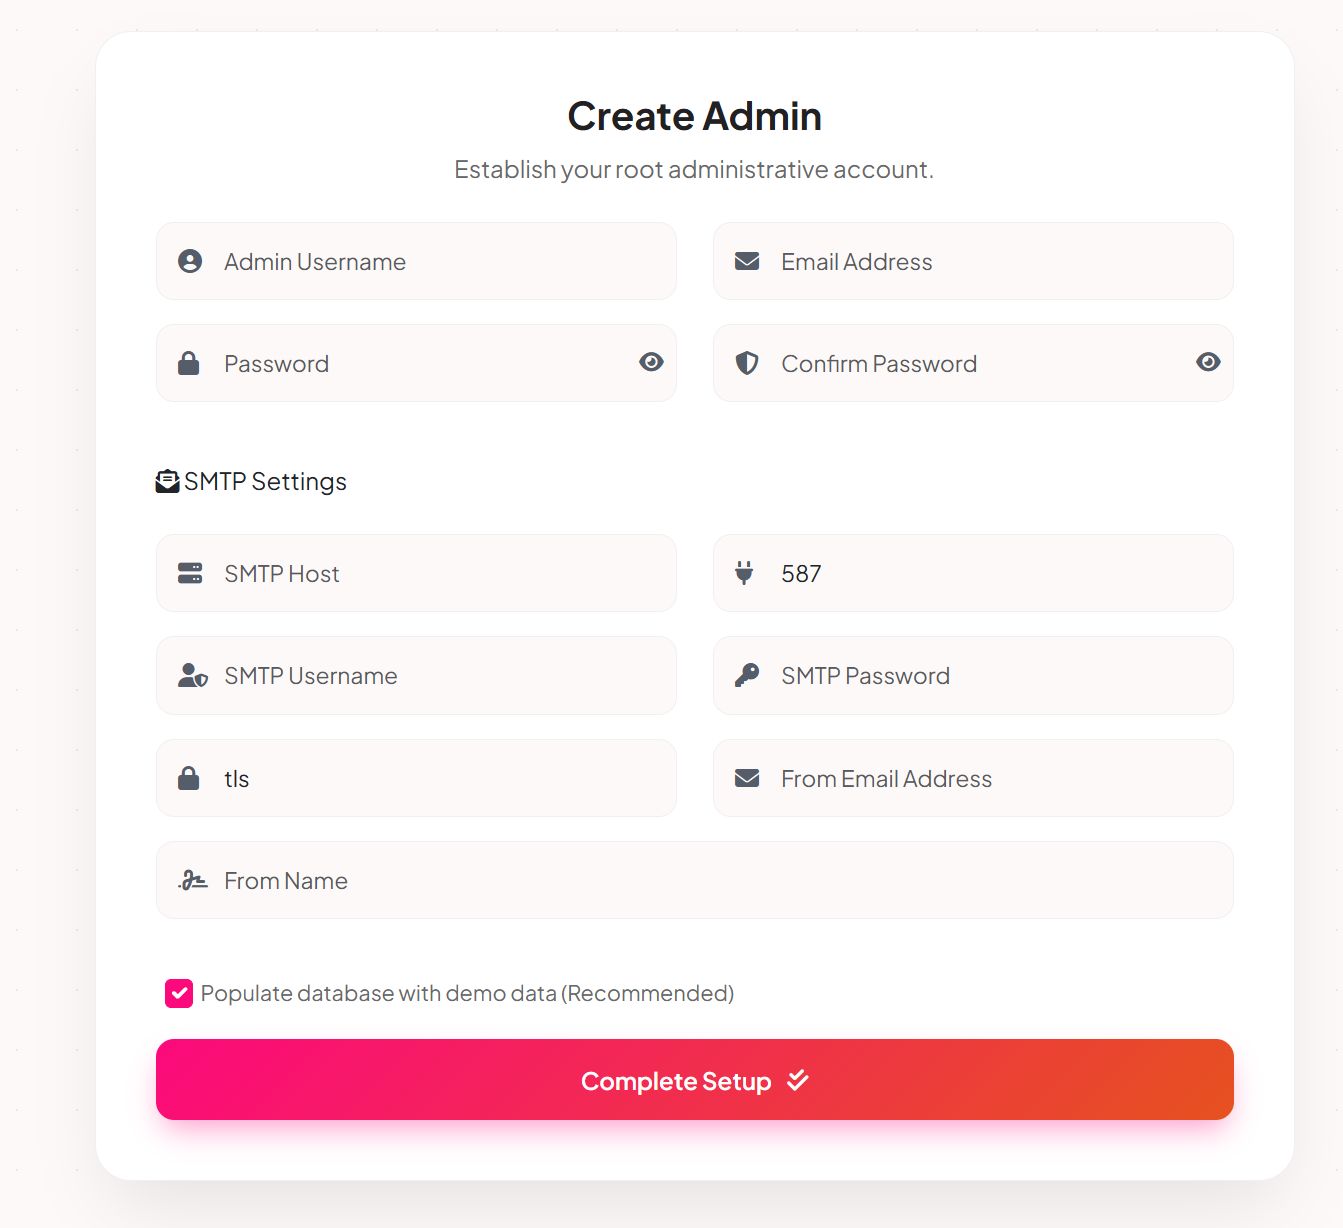
.env Setup & App Key Generation
If your package does not include a .env file, you must create it from the default example before opening the application.
.env file is missing, Laravel cannot load your app
configuration. The website may show a server error, fail to connect to the database, and the
installer or admin panel may not work correctly until you complete both required steps:
create .env from .env.example and run
php artisan key:generate.
- Go to your project root where the Laravel files are extracted.
- Make a copy of
.env.exampleand rename the new file to.env. - Open the
.envfile and update your application URL and database credentials. - Generate the Laravel application key so the
APP_KEYvalue is written automatically.
Required commands: Run these two commands in your project root:
cp .env.example .env
php artisan key:generate
Windows PowerShell:
Copy-Item .env.example .env
php artisan key:generate
Recommended values inside .env:
APP_NAME="Eventiq"
APP_ENV=production
APP_URL=https://yourdomain.com
APP_KEY=base64:generated_app_key_here
DB_CONNECTION=mysql
DB_HOST=127.0.0.1
DB_PORT=3306
DB_DATABASE=your_database_name
DB_USERNAME=your_database_user
DB_PASSWORD=your_database_password
SESSION_DRIVER=file
QUEUE_CONNECTION=database.env file manually from .env.example using
File Manager. Then run php artisan key:generate from Terminal/SSH if available. If
Terminal is not available, use the built-in web installer so the environment file and application
key can be created properly.
Deployment Methods
Choose the environment that matches your hosting provider:
Using the Eventiq Web Installer
- Upload the
Eventiq.zipfile to your domain's root directory. - Extract the files.
- Open terminal or SSH in the project root and run
composer install --no-dev --optimize-autoloader. - If the
.envfile does not exist, create it from.env.example. - Visit
yourdomain.comin your browser or open/installer/installdirectly. - The wizard will check your server permissions and database connection.
Standard cPanel Installation for Eventiq
-
Open File Manager: Log in to your cPanel. Under the
Files section, click on File Manager.
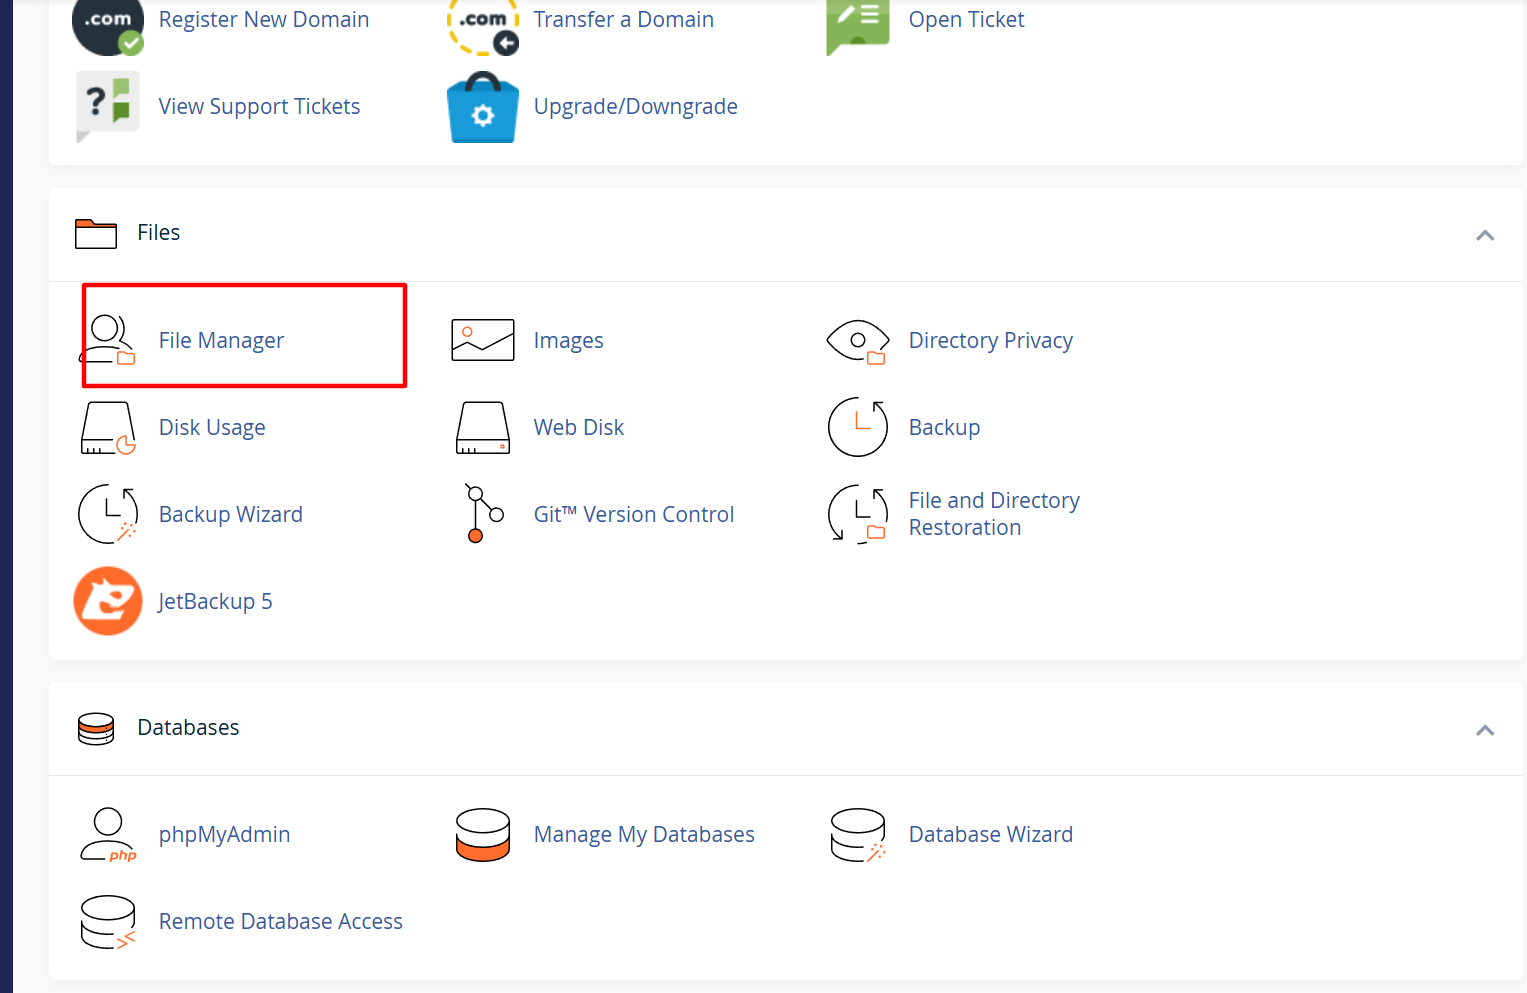
-
Navigate to Root: Locate and double-click the
public_htmlfolder. This is the directory where your website files must be placed.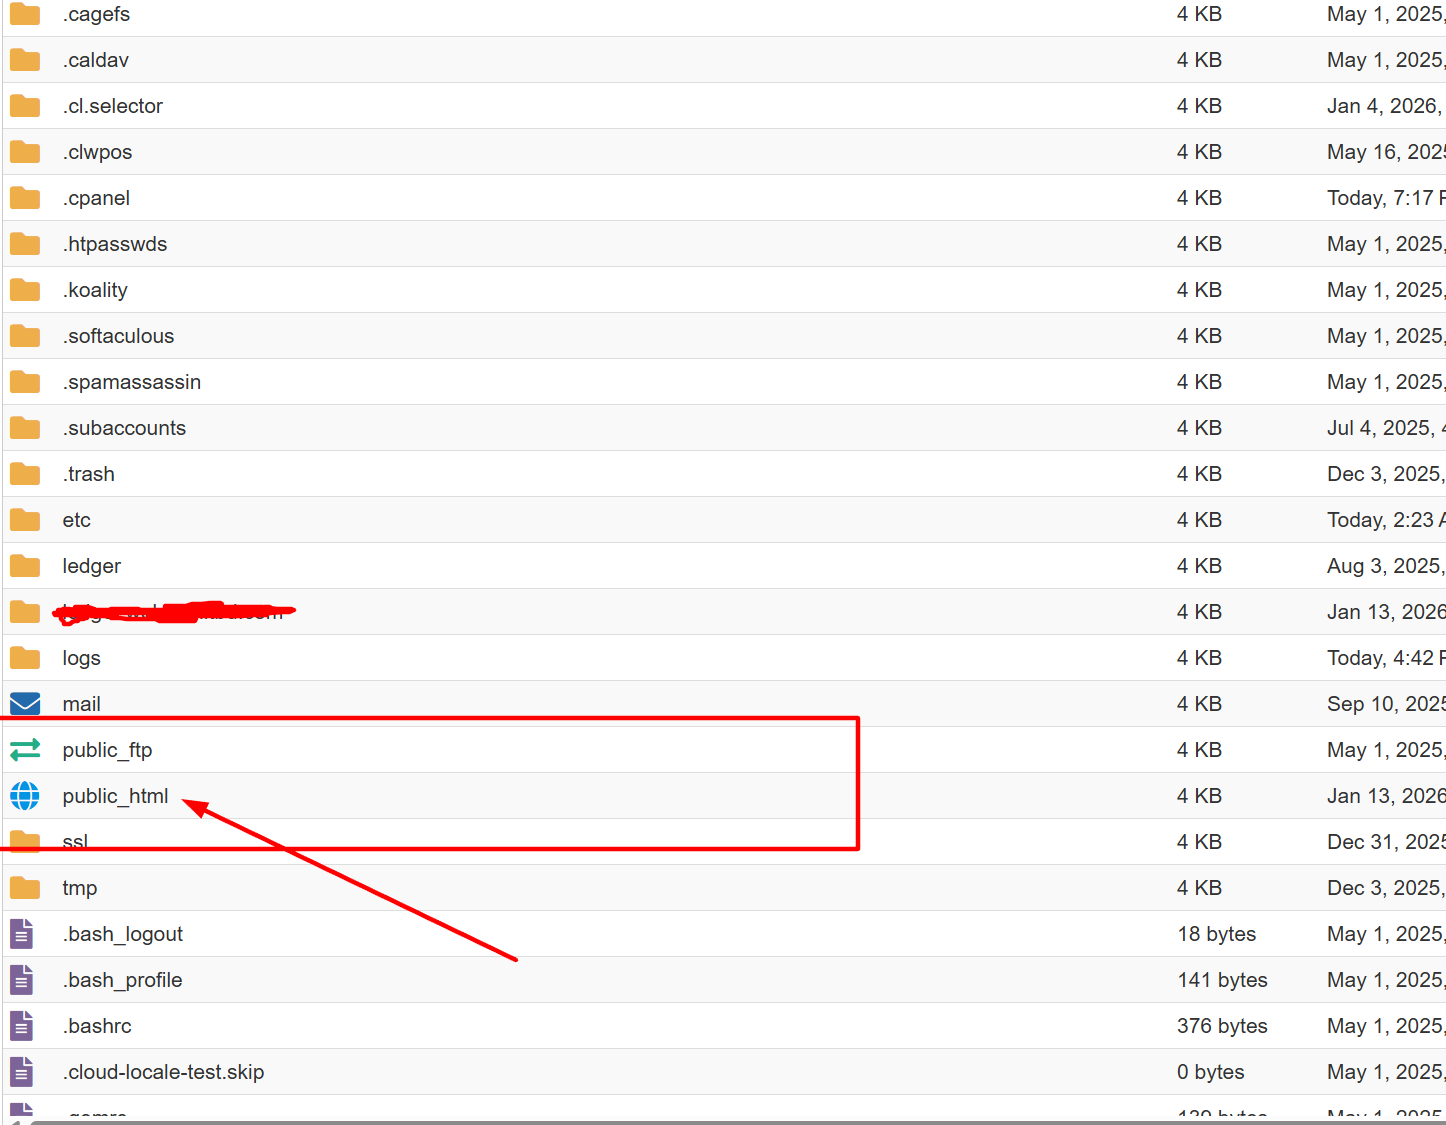
-
Upload Project: Click the Upload button in the top
menu. Select the
eventiq.zipfile from your computer and wait for the progress bar to turn green.
-
Extract Files: Right-click on the uploaded
eventiq.zipand select Extract. Ensure the destination is/public_html.
-
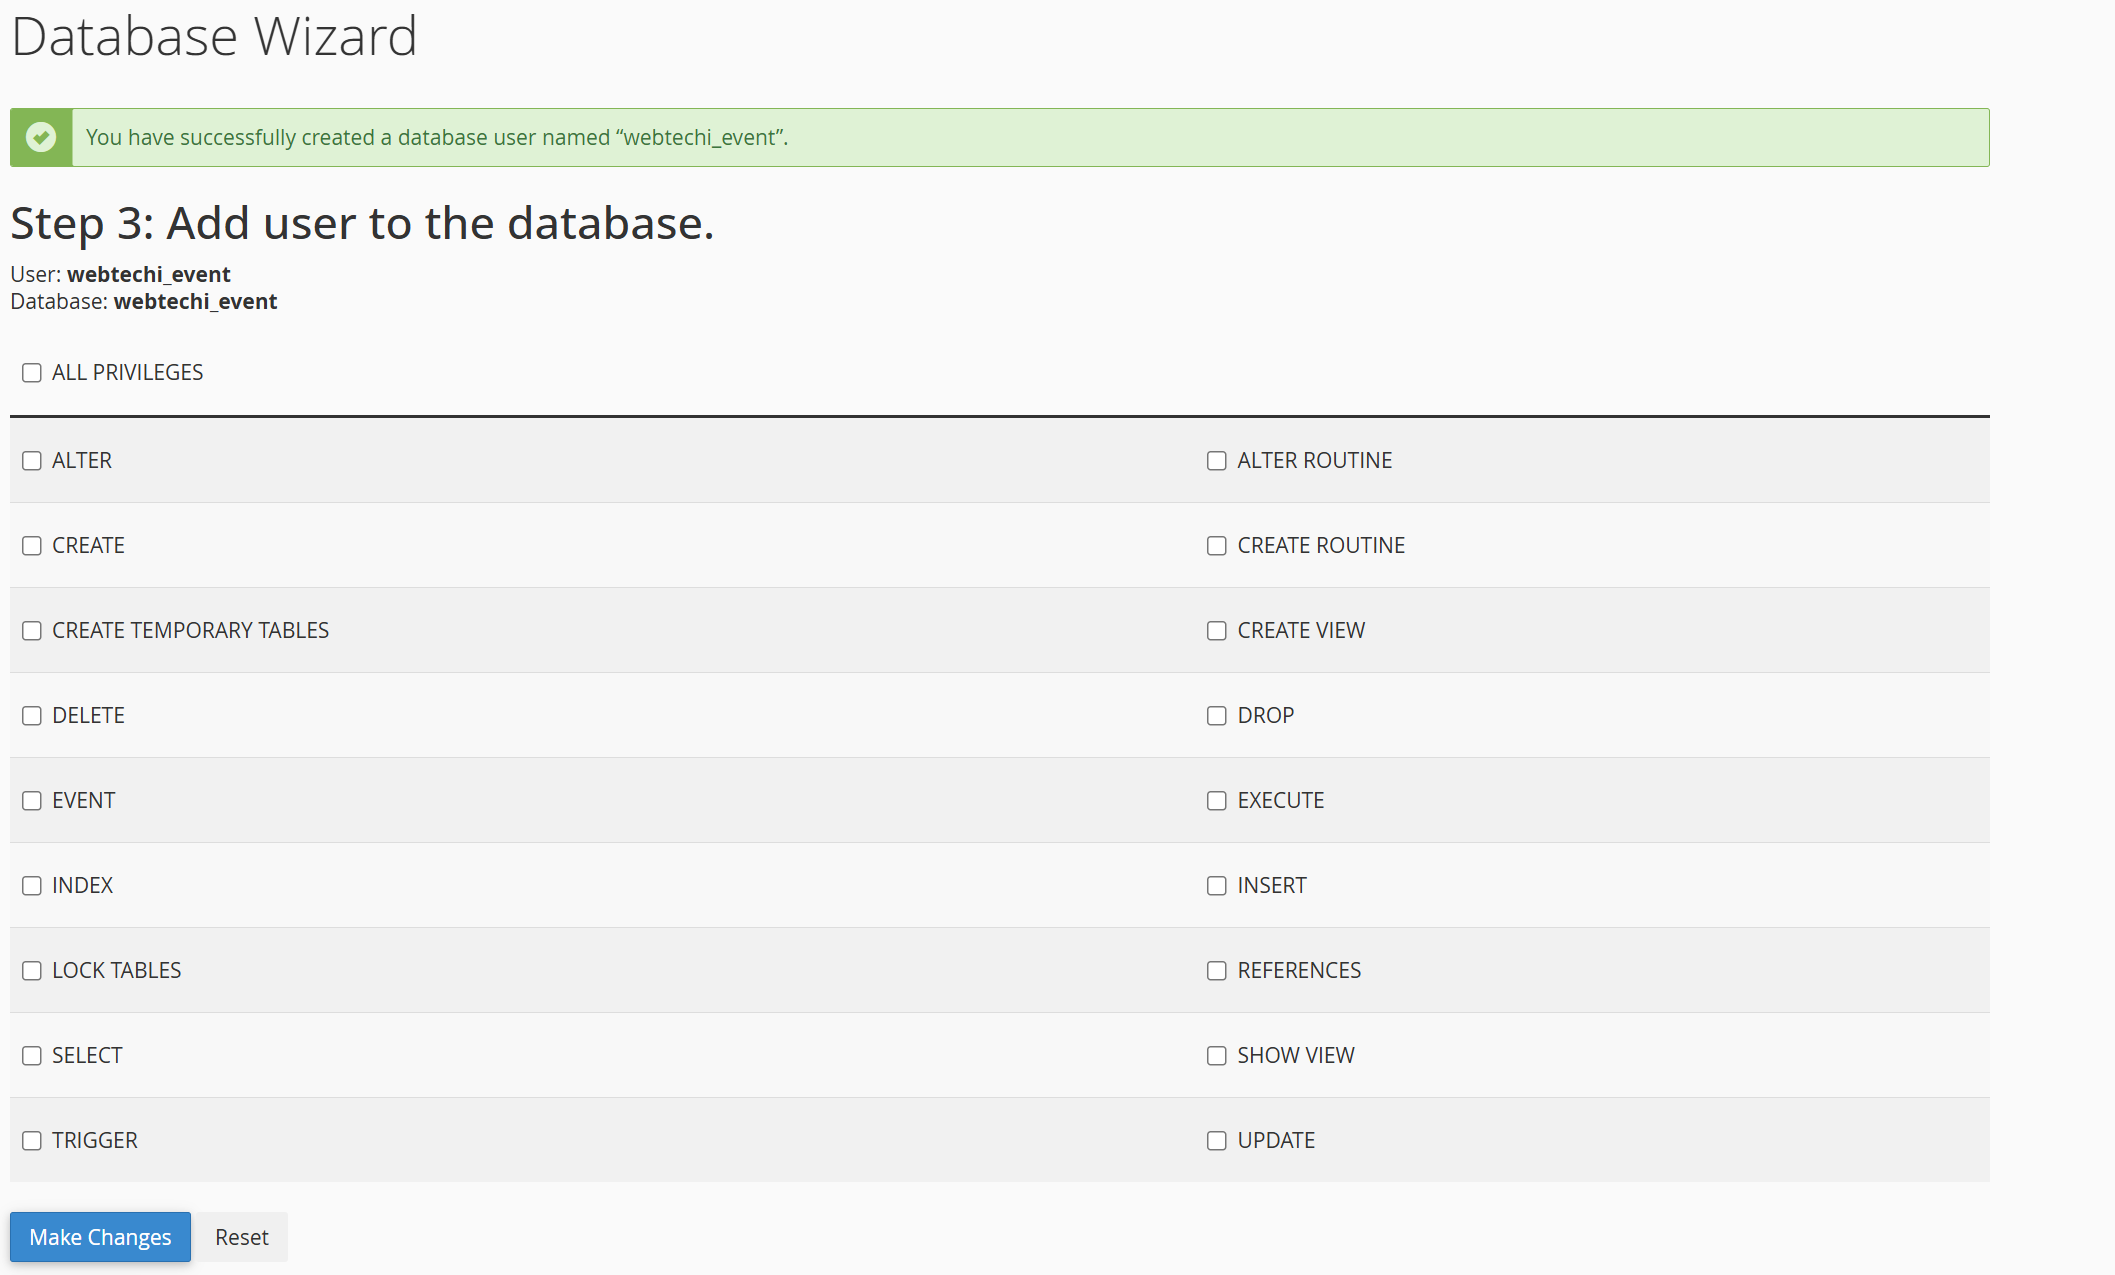
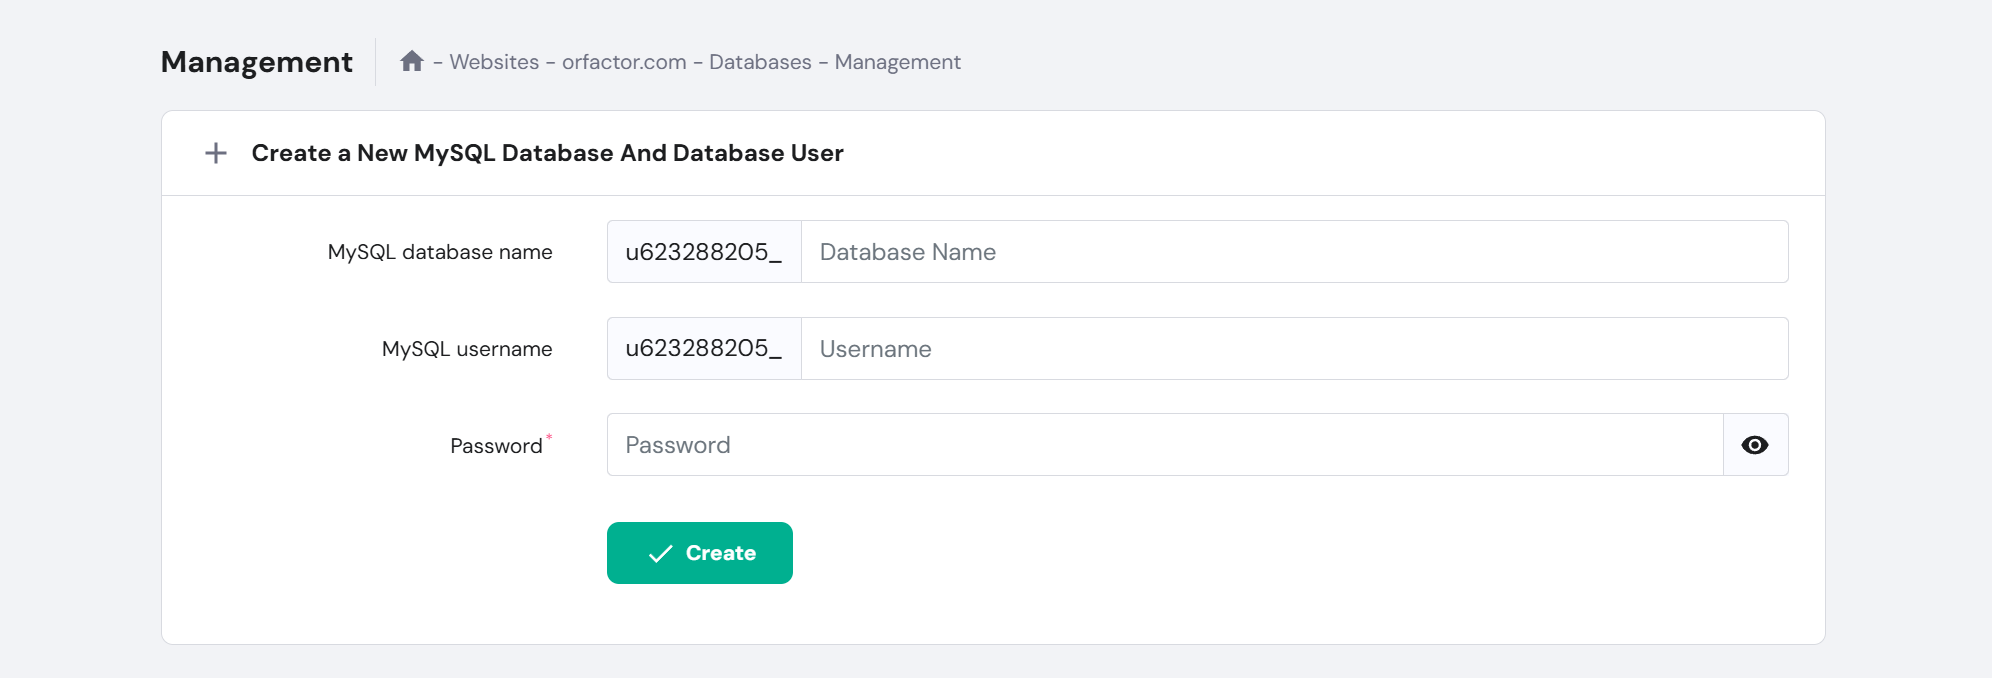
Create Database: Go back to cPanel Home and click MySQL
Database Wizard.
- Step 1: Name your database (e.g.,
orfactor_event). - Step 2: Create a user and a strong password.
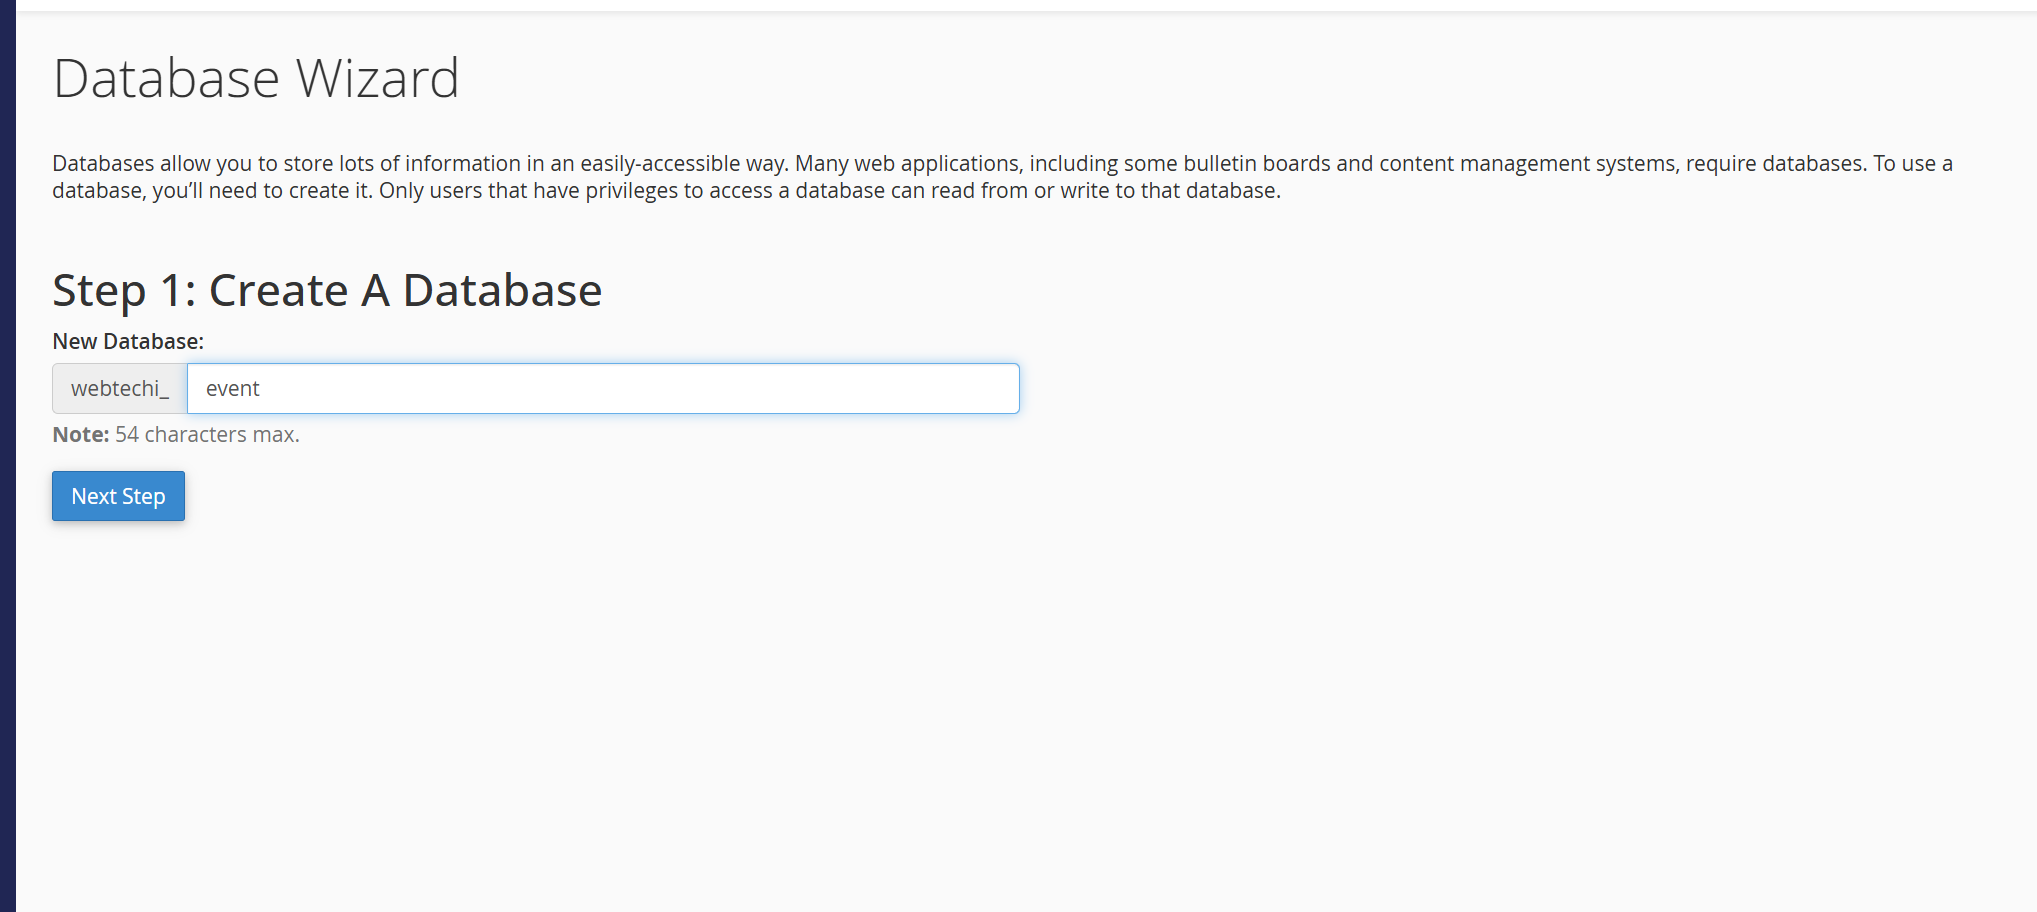
- Step 1: Name your database (e.g.,
-
Assign Privileges: On the final step of the wizard, check the
ALL PRIVILEGES box and click "Make Changes".
-
Domain & Environment:
Point your domain to the
/publicfolder via the Domains setting in cPanel. Runcomposer install --no-dev --optimize-autoloaderin the project root first. If.envis missing, copy.env.exampleto.env, then update the database name, user, password, andAPP_URL. After that, runphp artisan key:generateonce to create the application key.
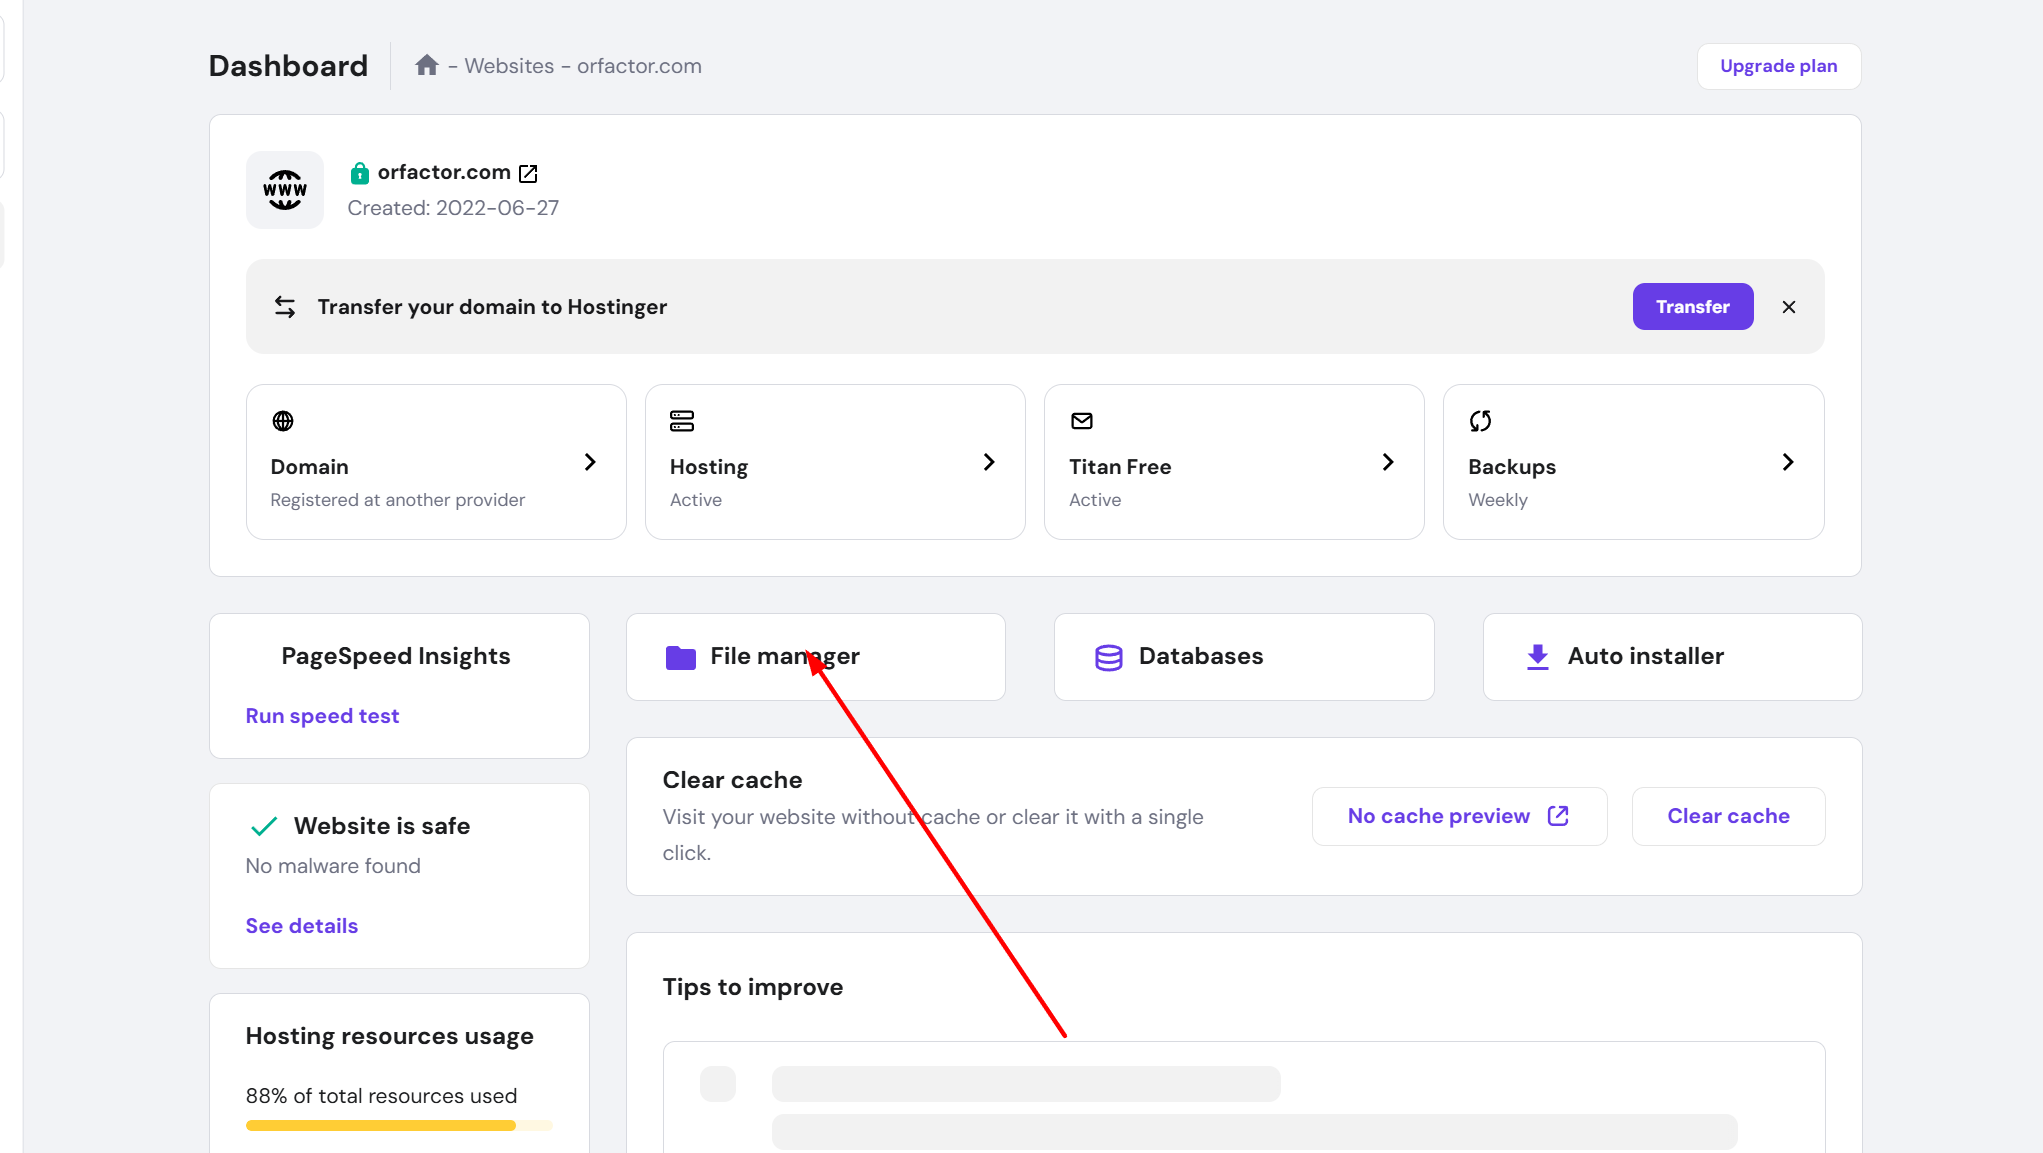
Hostinger hPanel Setup for Eventiq
-
Access File Manager:
Log in to your Hostinger dashboard. Locate the Files section and click
on File Manager.
-
Select Domain Directory:
Navigate to
domains/yourdomain.com/public_html. Ensure you are in the correct root directory before uploading.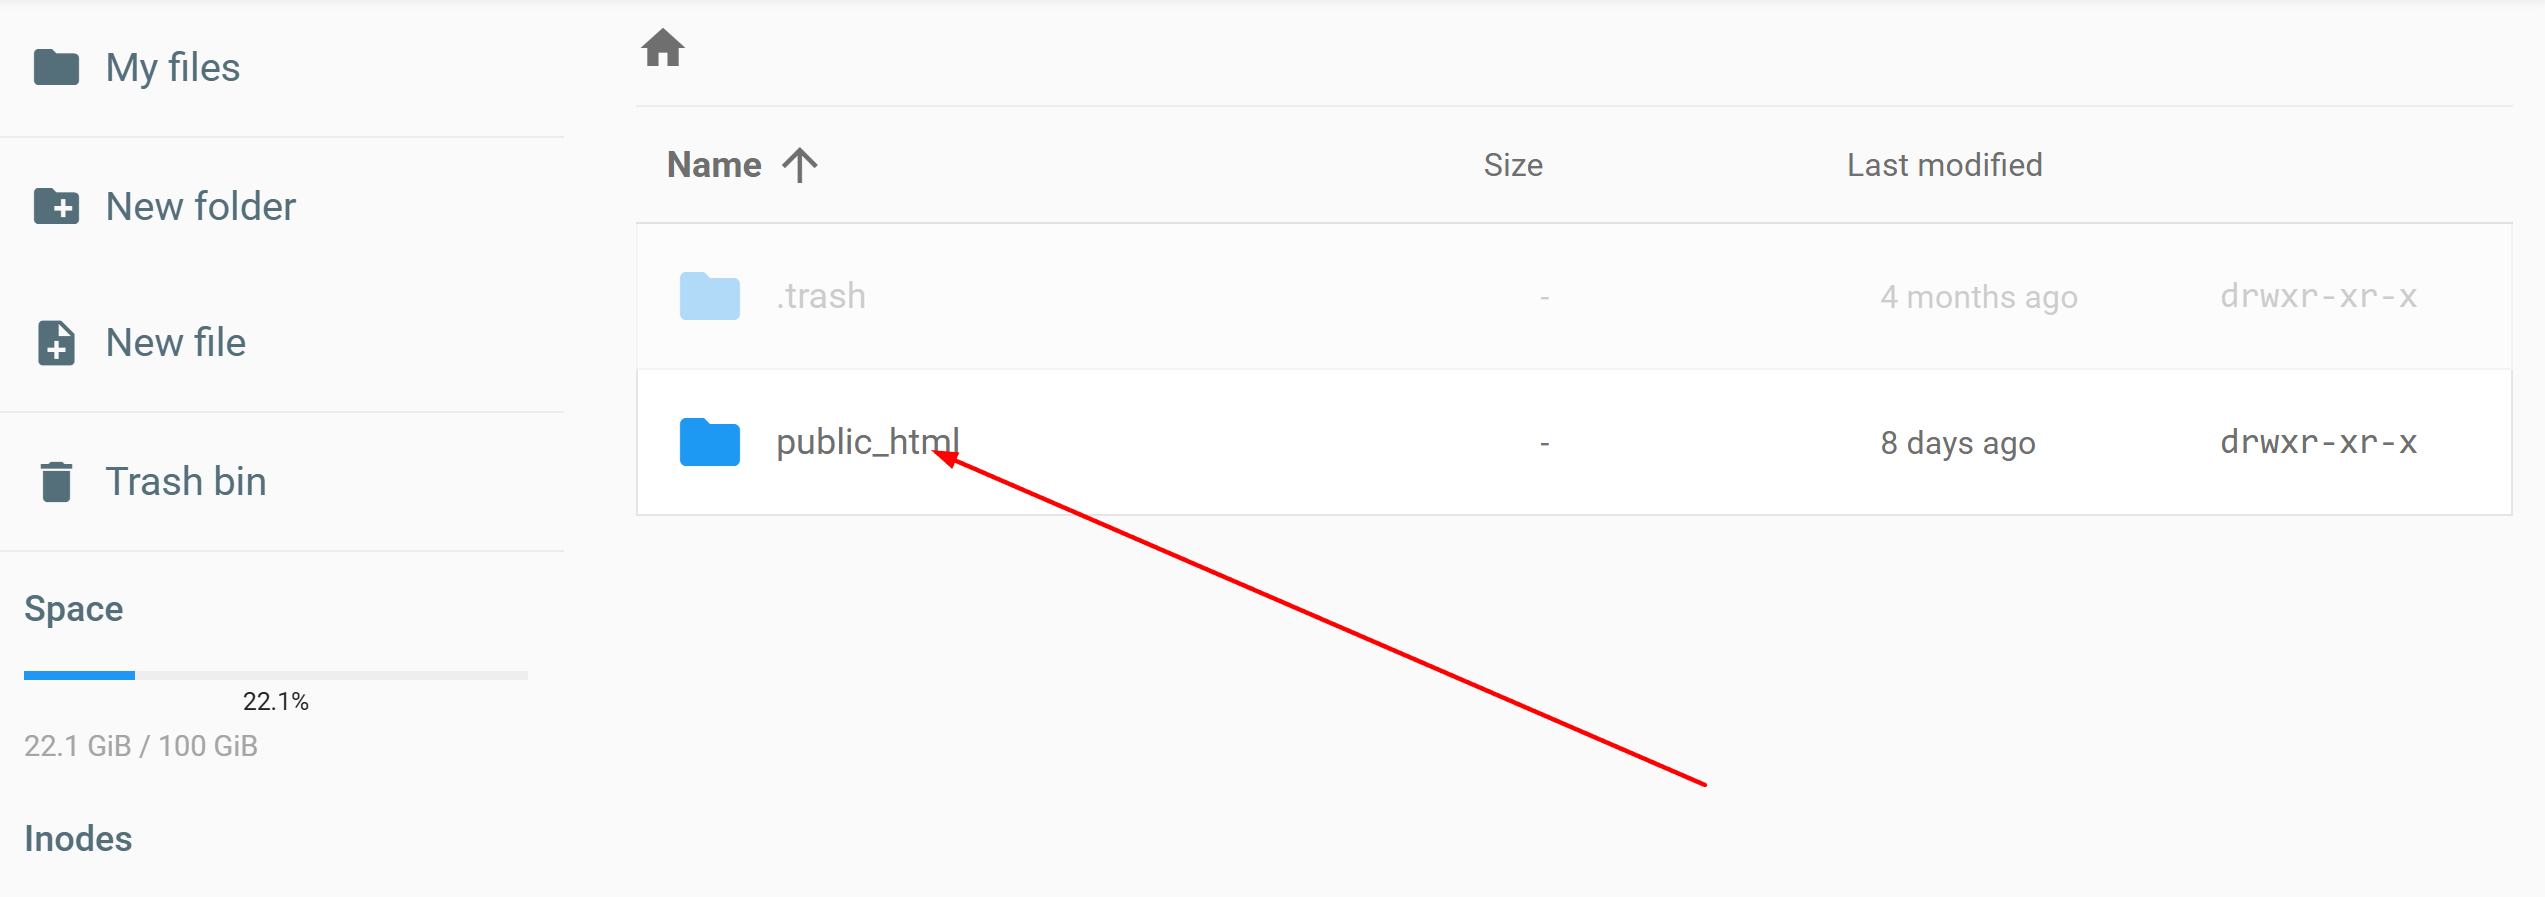
-
Upload Source Code:
Click the Upload button (arrow icon). Select
eventiq.zipfrom your local machine and wait for the upload to complete.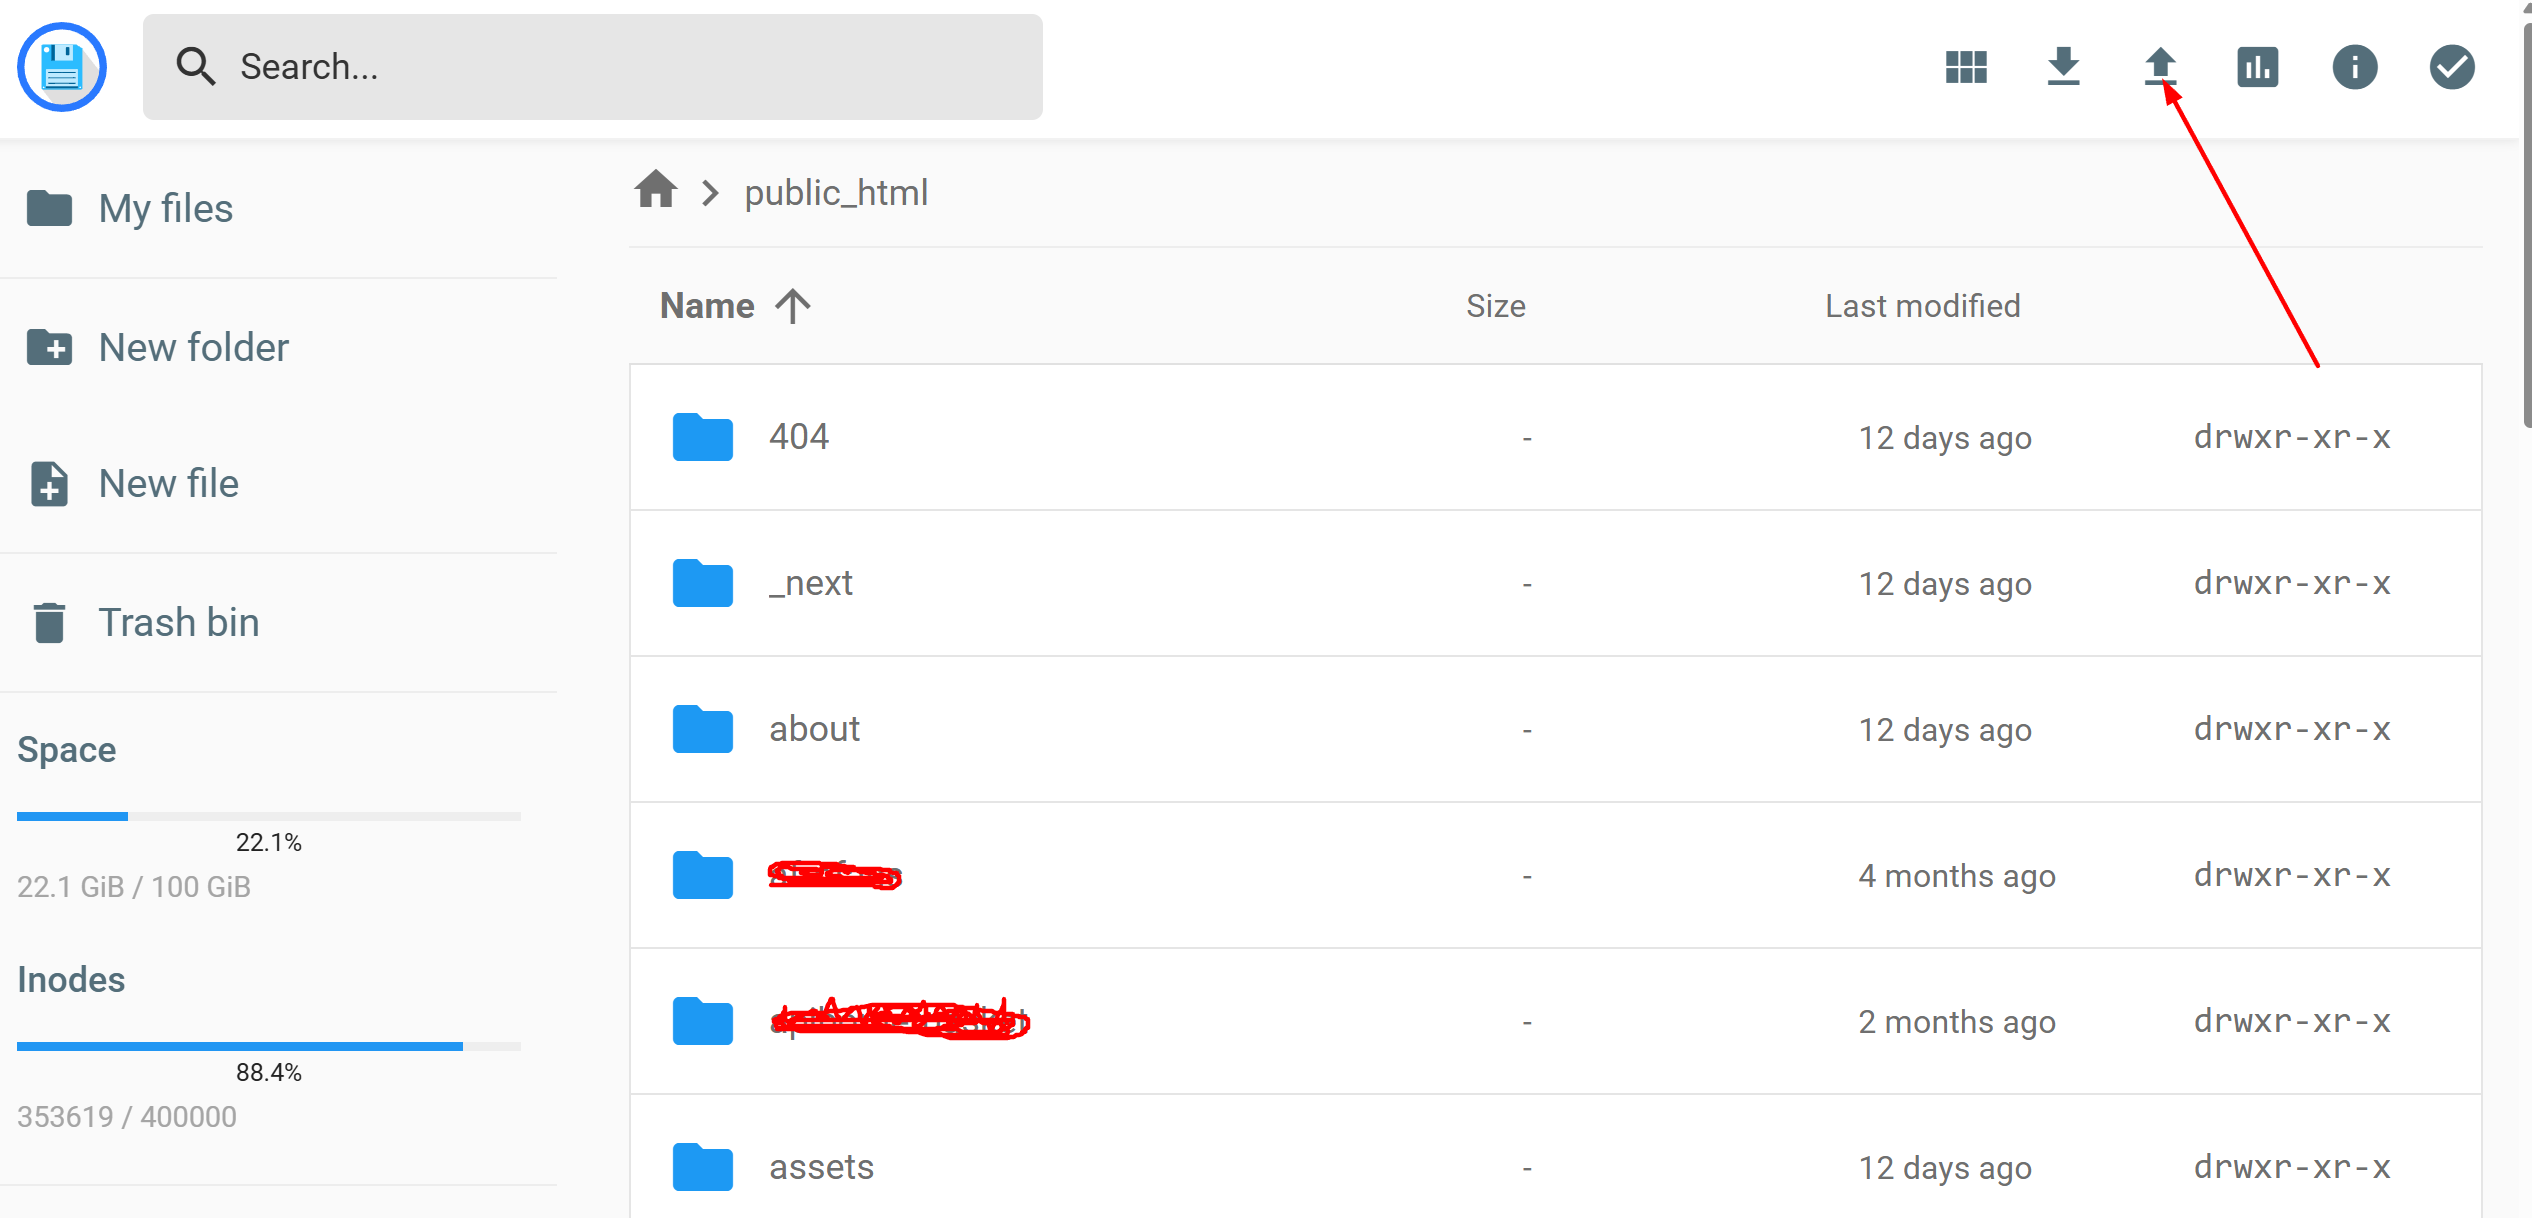
-
Extract the Project:
Right-click the
eventiq.zipfile and select Extract. Choose the current directory as the destination to ensure files are placed inpublic_html.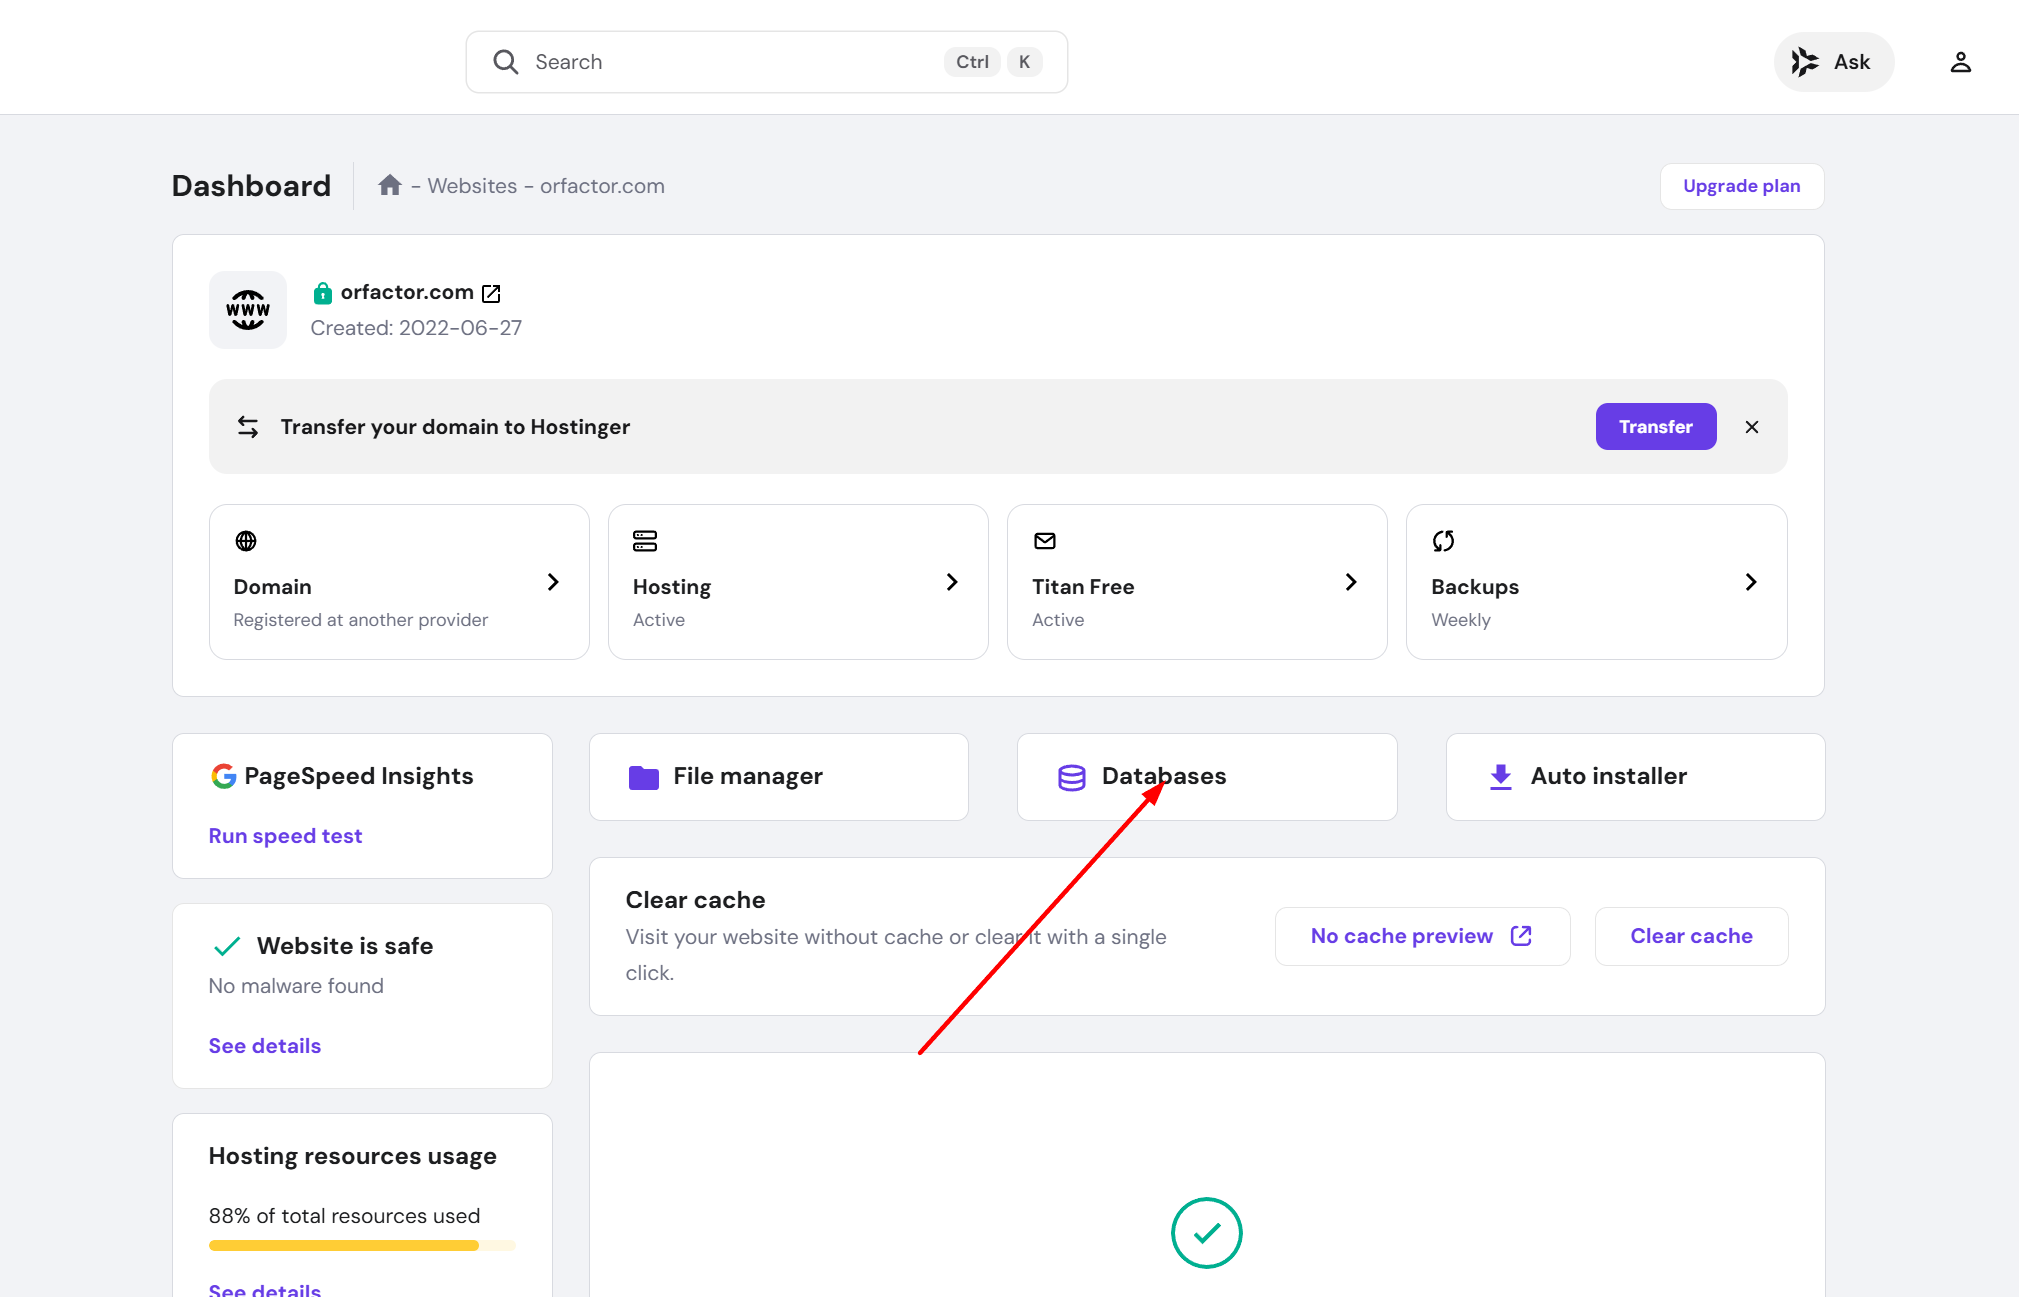
- PHP Version Setup: Go to Advanced -> PHP Configuration. Ensure your version is set to PHP 8.2 or 8.3 to meet the system requirements.
-
Create MySQL Database:
Navigate to Databases -> MySQL Databases. Enter your database name,
username, and a strong password. Click Create.
-
Configure .env File:
First run
composer install --no-dev --optimize-autoloaderin the project root. If the extracted project does not include a.envfile, duplicate.env.exampleand rename it to.env. Then add your database credentials and correctAPP_URL. -
Generate Application Key:
Open the Hostinger terminal or connect with SSH, go to the project root, and run
php artisan key:generate. This will automatically create theAPP_KEYvalue required by Laravel.